Saturday, June 15, 2013

Show and Tell

Show & Tell-Photopolymer


If you haven’t yet had the opportunity to play with our new photopolymer sets, you are missing out! There are some clear advantages (forgive the pun) to using clear stamps. Number one—there is no guesswork when trying to achieve perfect placement. I also love the look of multiple images creating a pattern.
Show & Tell 1 and 2 are sets packed with buildable stamp images. And the shapes are perfectly on trend: arrows, hexagons, flags, and more.
To show off this set, I created a few quick projects. First, I made a card with the hexagon “Hello.” Using new colors, I alternated between Strawberry Slush, Coastal Cabana, Crisp Cantaloupe, and Smoky Slate. This card came together so quickly.


Next, I used one of the arrow images and created a pretty background on this tag using Pistachio Pudding ink. I added a cute “You’re lovely” greeting that has been embossed in gold.


Last, I created a card background by stamping rows of images. I really like to use Whisper White Craft ink to stamp on colored cardstock. I’ve added a cute sentiment in the negative space created from punching out a circle on my card. This “Hello, you” is from Regarding Dahlias, another stamp set I have fallen in love with.


Right now, Stampin’ Up is also offering an online class that explores all the wonderful techniques and benefits of stamping with photopolymer. The Show & Tell Bundle offers the class and both stamp sets at a discounted price. Click here to learn more!
I could keep creating with these sets for days! Have you enjoyed working with our new photopolymer stamps, too? Tell us about it below!
Jen C.
Concept Artist

Monday, June 10, 2013

Craft Table Product Sneak Peek!

Sneak Peek of Product at an Up coming Woman's Conference at Radiant Church this weekend!
 
Fathers Day Chocolate Bar $2.00


Small Chalk Clip Board with Stamped Saying $5.00

 
Magnetic Scrap paper holder $2.00

 
Gum $1.00

 
Paper Clip Book Marks $2.00

 
Refrigerator Clothes Pin Magnets $2.00


Chap Stick Cozy $4.00


Kleenex Holder $1.00


Chocolate Holder $1.00

 
Necklace $5.00


Post It Notes $1.00


Small Legal Pads $3.00

 
CD Paper Case $7.00

 
CD Post It Case $7.00

 
Post It Blocks $ 2.00


All this and more is available by me and if you want to learn to make any of it just join a class I have available and put in the comment section what you would like to make. You can join a class by clicking the class tab at the top of the page. 
 

Splattering Tutorial

Splattering Tutorial


Today I wanted to demonstrate some basic techniques for creating different splatter sizes. I like to use the larger Aqua Painter for all of the splattering I do because the bristles hold more ink. I start by filling the Aqua Painter with some Classic Stampin’ Ink Refill and rubbing alcohol. The more ink refill I use, the darker the splatters will be.
Small splatters

Squeeze your Aqua Painter to get some ink into the bristles. Then lightly tap your Aqua Painter on your pointer finger and over your project.
Medium splatters

Squeeze your Aqua Painter to get ink into your bristles. It’s basically the same motion you used with the small splatters—without the tapping . . . and you will want to hold your Aqua Painter more upright. Quickly move your Aqua Painter towards your project and stop abruptly. You’re basically trying to fling the ink onto your project.
Big splatters (drops)

Hold your Aqua Painter vertical—and high above your project. Squeeze the Aqua Painter and let it drip onto your project.
Another fun technique you can try is mixing VersaMark Refill with rubbing alcohol. This will leave sticky splatters that you can cover with embossing powder, like our Gold Stampin’ Emboss Powder. So fun!
I hope you found these tips helpful. If you have any questions, let me know! I’d be happy to answer them.
Christina N.
Concept Artist
 GET THE AQUA PAINTER FROM ME TODAY! lisacoffey.stampinup.net 

Wednesday, June 5, 2013

Best of...stamp set now available!

Best of . . .


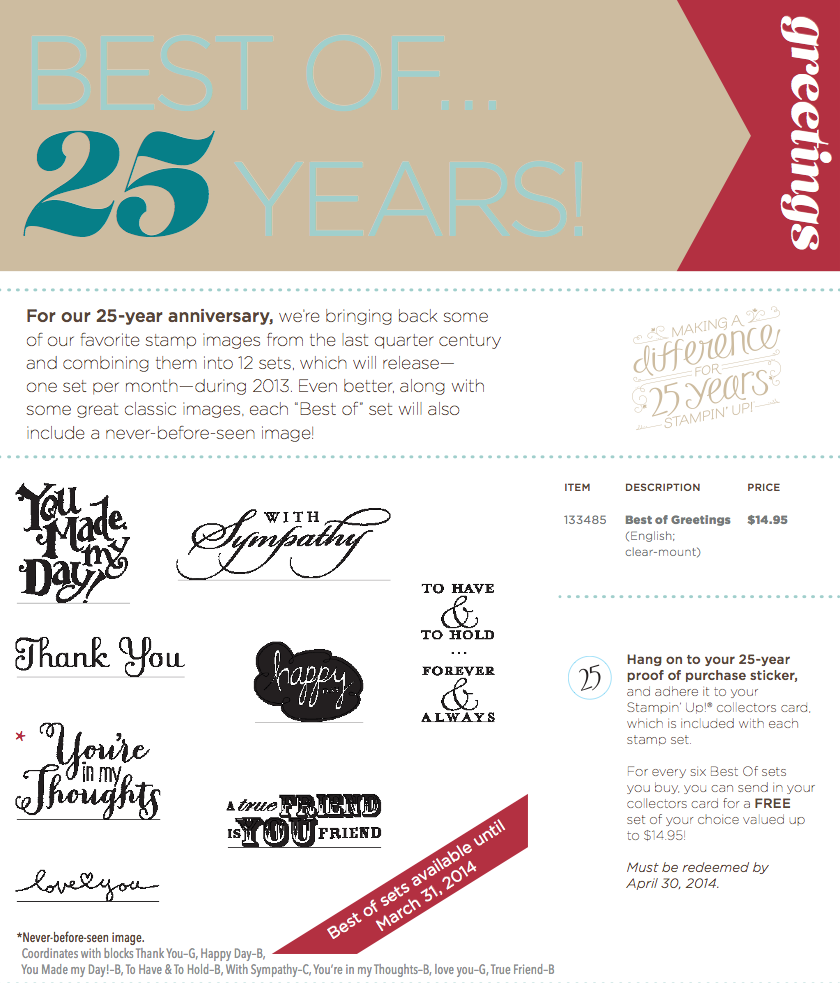
We all have things we need to tell people—Thank you, Love you, You’re in my thoughts, With sympathy, and so on. This month’s Best Of stamp set, “Best of Greetings,” is exactly what you need to share those special thoughts with important people in your life. Your cards, tags, or gifts don’t have to take a lot of time, either.
This Thank You card is made with Whisper White Cardstock and three Classic Stampin’ Pads: Island Indigo, Pool Party, and Basic Gray. Put one corner of the ink pad directly on to the cardstock and swipe it all the way across. The imperfection of the lines gives it a watercolor look—which is very trendy right now. Use up scraps to punch out little hearts, attach them to paper (sew them on or use adhesive), and stamp “Love you” for a little love note.
A little extra time and thought on your part could make a huge difference in someone else’s life . . . and might be just the thing they need that day.
Angie B.
Sr. Concept Artist
show 1 comment

Monday, June 3, 2013

NEW CLUBS AND SHARES STARTING SOON!

2013/2014 Stampin UP! Clubs and Product Shares
 
With the new catalog coming out on June 1st who can afford all the new goodies that make our eyes dry out from going over the catalog cover to cover all day everyday! I know I cant...but don't worry, I have a solution! Join a club or product share with me today!
 
How does it work? You will spend a set amount each month depending on the club or share you join and become a hostess one of the months you order and get FREE product that month along with your normal order. Simply pick a club and email or comment to me which you are interested in. The club or share will start when all the members needed to fill it sign up...so that means get your friends to join too and you can start shopping today!
*You can join more that one club...no one over here will stop ya! :)
 
Simple Stampin Club:
Cost per month: $ 25 + tax and shipping
6 ladies need to spend $25 (before tax and shipping) each month
*one of those months you will be the hostess and receive the FREE product that comes with being the hostess.
 
Marker Club:
Cost per month: $ 32.81 + $15+ tax and shipping
# of ladies needed to complete club: 4
4 ladies need to send me $32.81 each month for the markers and order an additional $15 in catalog product.
Every month each lady will receive one whole color family of markers and whoever is the hostess for the month will receive a box to store all the markers in and any FREE hostess benefits for that month.
 
IN Color Club:
Cost per month:$ 37.01
# of ladies needed to complete club: 5
5 ladies need to send me $37.01 each month to gain all the new in color products in the catalog. They will receive one of the 5 in colors every month.
What you get:
*In Color Markers
*In Color Stamp Pads
*In Color Re Inkers
*In Color Paper
* In Color Ribbon
*In Color DSP
*Dimensionals
*Accessories
*The hostess will get all hostess benefits and the storage box for the markers.
 
Ribbon Share:
 
3/4" Chevron Ribbon (12 colors)
Cost $25.66
# of ladies needed to complete share: 5
*each lady will receive 2 yards of each color
 
3/8" Stitched Satin Ribbon (5 colors)
Cost $11.18
# of ladies needed to complete share: 5
*each lady will receive 2 yards of each color
 
3/8" Ruffle Stretch Trim (5 colors)
Cost $ 11.18
# of ladies needed to complete share: 5
* each ladies will receive 2 yards of each color
 
3/8" Taffeta Ribbon (5 colors)
Cost $ 8.99
# of ladies needed to complete share: 5
* each lady will receive 2 yards of each color
 
1/8" Taffeta Ribbon (7 colors)
Cost $ 10.50
# of ladies needed to complete share: 5
* each lady will receive 2 yards of each color
 
1/2" Seam Binding Ribbon (6 colors)
Cost $10.51
# of ladies needed to complete share: 5
*each lady will receive 2 yards of each color
 
1/4" Stitched Grosgrain Ribbon ( 10 colors)
Cost $ 12.22
# of ladies needed to complete share: 5
*each lady will receive 2 yards of each color
 
Bakers Twine ( 5 colors)
Cost $4.62
# of ladies needed to complete share: 5
* each lady will receive 5 yards of each color
 
Leave a comment or contact me today to join in on one of these amazing opportunities!


ALL THESE GREAT NEW PRODUCTS

Our New Favorite Products

One of the best parts about being concept artists is that we get to see and use our new products so early. Actually, it can be a little torturous to use the new products and then have to wait to share with everyone else. We’re so glad that it’s now time to share all of the wonderful new products in our latest annual catalog!
Each of us has made a quick sample using some of our favorite new products.

Robyn:

Here are some of my favorites from the new catalog:

Angie:


There are SO many favorites in this catalog that it was hard to choose only a few.
Here is a list of my MUST HAVE RIGHT NOWs:
My favorite color combo right now is:
Crushed Curry, Coastal Cabana, Bermuda Bay, and Basic Gray – and any products containing those colors: washi tape, buttons, ribbons, Designer Series Paper, etc.

Melody:


I agree with the other girls: there are so many new and exciting products in this catalog—it’s hard to pick just a few—but somehow I managed! The favorites I picked for my project are:
I only used Pistachio Pudding and Crisp Cantaloupe on my card, but I love all of the colors in the new revamp. It was sad to see some of them go, but I honestly love the returning and new colors so much that I haven’t missed the old colors at all.

Chrissy:

 
Some of my absolute favorite things out of the new catalog (in no particular order) are:
  • The Basic Black 3/4'' Chevron Ribbon because it's so versatile. You can cut it down the middle for a skinnier diagonal-striped ribbon. It's amazing, and a must-have.
  • The Chalk Talk Framelits Dies are great for making fun-shaped tags, and I love gift wrapping. It's also a must-have.
  • The Dictionary Background Stamp can be made to look vintage, eclectic, or bright and fun. There are so many looks you can achieve with this one background stamp! Not to mention book paper is still one of my favorite trends. This will definitely be joining my background stamp collection at home on my shelf. No doubt I'll be reaching for it often.
  • Some of the new colors make me want to do a happy dance. Crushed Curry (oh, how I missed you!), Bermuda Bay, and the brand new Coastal Cabana are all absolutely beautiful!
And, last (but certainly not least) is MDS. One of my favorite features is being able to cut out some of our images with an e-cutter. It's one of my favorite things lately, and I don't think I’ll be getting tired of it anytime soon . . . or ever. It's amazing software and I love it!

Jen:

 
There’s so much to love in our new annual catalog. I recently won a little Stampin’ Up! product certificate from our health fair at the home office. I’ve been holding off on redeeming my certificate so I could get my favorite new things:
  • Tag a Bag Bundle – I’m thrilled to have Crushed Curry and Bermuda Bay back! I love the colors in the Tag a Bag Accessory Kit.  They’re versatile and bright, and I can’t wait to use them for treat bags. And they’re a great value at $9.95 for the bundle.
  • Thanks & Hello Stamp Set – Thanks & Hello are also versatile. I send more cards with “Thanks” or “Just because” than anything else. They’re sure to be a “go-to” set in my collection at home.
  • Crushed Curry 3/4" Chevron Ribbon – I love adding ribbon to gifts and treats. With the chevron pattern in crushed curry and white, it was love at first sight!

We hope that you are enjoying the new annual catalog as much as we are. And we’d
love to hear what’s on the top of your shopping list . . . !
Concept Art Team
 You can get ALL of these awesome new products from me today! Click here to order now or contact me! 

Saturday, June 1, 2013

MDS Documenting May!

Check out all the cool things you can do with our digital program! Its only $19.95 now and downloads are wayyyyyyyy cheaper than stamp sets! Contact me today to order you very own digital set...I will be hosting a class soon on how to use it!

lisacoffey.stampinup.net

Documenting May

Have I said how much I love this project? Well, I do. I have been working on this for five months, now, and every time I finish documenting a month I am so excited to start working on the next!


As you can see, you don't need divided page protectors for this project. Just add your photos and little pocket cards to a 12" x 12" piece of cardstock—or you can even do it all digitally.   


This month I saved some serious time by using the This Makes Me Happy Pocket Cards download. Can I just say . . . I LOVE THIS DOWNLOAD! All I did was add some journaling and a few digital stamps to the cards. Then I printed them out and was pretty much done! It was so simple, and I love how all the colors work so well together. I really am so happy with my pages this month. If you are doing a project like this (or you are thinking about it) you have to get this download.


This month I also made a quick 8-1/2" x 11" page with the pics of our trip to Hawaii to add as an insert to my album. To make this layout, I used one of the photo templates that comes with My Digital Studio. I just scooted the photo boxes a little closer together and shrank the template down a little to get this look. I already made a separate photo album with our Hawaii pictures but I still wanted to include a few of my favorite photos in this album—so this quick page is perfect.

I hope this gives you some good inspiration for documenting your life!

Arika B.
Concept Artist